• Skip to main content
  • Skip to footer

Elite Sandstone

Elite Sandstone

  • Home
  • Our Story
  • Products
    • Sandstone Stepping Stones
    • Sandstone Memorials
    • Sandstone Cladding And Sandstone Feature Wall
    • Sandstone Fireplace And Sandstone Hearth
    • Sandstone Landscape & Sandstone Furniture
    • Sandstone Letter Boxes
    • Sandstone Tiles & Sandstone Pavers
    • Sandstone Pool Coping
    • Yatala Showroom
    • Rubble Manhandleables
    • Sandstone Cleaning
    • Sandstone Cladding
    • Sandstone Columns
    • Sandstone Stairs
    • Marble Furniture – RC Surfers Paradise Parish
  • Testimonials
  • Blog
  • Contact Us
  • 0477 218 198

Uncategorized

Everything You Need to Know About Crazy Paving

28 August 2024

Crazy Paving

Are you tired of conventional garden paths? Sick of the uniform, predictable patterns that seem to dominate every outdoor space? If you’re seeking something that truly reflects your individuality and adds a splash of character to your garden, then it’s time to consider Crazy Paving.

Crazy Paving is a playful and eye-catching paving technique that uses irregularly shaped stones, bricks, or tiles to create a unique mosaic effect. It’s a bit like putting together a giant jigsaw puzzle, but the result is a stunning, one-of-a-kind path that’s both functional and artistic. 

However, before you dive into this exciting project, there are a few important things to consider. This comprehensive guide will walk you through the history, pros and cons, installation process, and material selection to ensure your Crazy Paving project is a success.

The History of Crazy Paving

The origins of Crazy Paving date back centuries, with its roots in medieval Europe. During that time, cobblestones and other irregularly shaped stones were readily available and commonly used for roadways and pathways. The practicality of using what was on hand led to the development of Crazy Paving as a functional solution, but it didn’t take long for people to appreciate its aesthetic appeal.

In the Victorian era, Crazy Paving saw a resurgence in popularity, particularly in England. The romantic and rustic look of these irregular stones fit perfectly with the Victorian fascination with gardens and outdoor spaces designed to mimic the natural world. 

Crazy Paving became a staple in garden design, used to create charming, whimsical walkways that added a touch of enchantment to any landscape.

The Pros and Cons of Crazy Paving

Like any design choice, Crazy Paving comes with its own set of advantages and challenges. Here’s a closer look at what you can expect from this unique paving style.

Pros:

Uniqueness:
Crazy Paving offers a truly unique look that sets your garden apart from the rest. No two paths are ever the same, giving your outdoor space a distinctive character that reflects your personal style.

Character:
The irregular shapes and natural textures of Crazy Paving add depth and charm to any garden. This paving style can evoke a sense of history, making your garden feel timeless and inviting.

Versatility:
Crazy Paving isn’t just for garden paths—it can be used for patios, driveways, courtyards, and even as decorative borders. Its versatility makes it a great choice for a variety of outdoor projects.

Cons:

Cost:
The cost of Crazy Paving can be higher than other paving options. The irregular stones may be more expensive to source, and the installation process can be more labour-intensive.

Maintenance:
Crazy Paving can require more maintenance than traditional paving styles. The gaps between stones can collect dirt and debris, and weeds can easily sprout if not properly managed.

Slip Hazard:
If not installed carefully, Crazy Paving can be uneven, creating a potential slip hazard, especially when wet. It’s important to ensure that stones are laid securely and level to avoid accidents.

Choosing the Right Materials for Crazy Paving

Selecting the right materials is crucial to the success of your Crazy Paving project. Fortunately, there are plenty of options to choose from, each offering its own unique look and feel.

Cobblestones:

Cobblestones are a classic choice for Crazy Paving. These natural stones are durable and come in a variety of colours and sizes, making them ideal for creating a rustic, old-world charm.

Flagstones:

Flagstones are flat stones that can be found in a range of sizes, shapes, and colours. They’re particularly well-suited for Crazy Paving because of their irregular edges, which fit together like a puzzle.

Bricks:

Bricks offer a more structured look while still maintaining the irregularity that defines Crazy Paving. They’re durable and available in a wide range of colours, allowing for creative design possibilities.

Tiles:

While less common, tiles can be used to create a more contemporary version of Crazy Paving. With a vast array of colours, patterns, and textures available, tiles can bring a modern twist to this traditional technique.

Installing Crazy Paving

Installing Crazy Paving may seem daunting, but with careful planning and attention to detail, it’s a project that can be tackled by anyone with a bit of DIY enthusiasm. Here’s a step-by-step guide to help you get started.

Step 1: Prepare the Area

Begin by clearing the area where you plan to lay your Crazy Paving. Remove any existing plants, trees, or debris, and ensure the ground is level.

Step 2: Mark out the Area

Use string, spray paint, or stakes to mark out the area you want to pave. This will help you stay within your desired boundaries as you lay the stones.

Step 3: Lay a Base

Create a stable base for your Crazy Paving by laying a bed of gravel or sand. This base will provide support and help with drainage, ensuring your path remains sturdy and long-lasting.

Step 4: Arrange the Stones

Start by laying the largest stones first, then fill in the gaps with smaller pieces. Experiment with different arrangements until you find a design that you like. Remember, there’s no right or wrong way to do Crazy Paving—it’s all about creativity and personal preference.

Step 5: Secure the Stones

Once you’re happy with the layout, use a rubber mallet to gently tap the stones into place. This will ensure they’re securely seated in the base material.

Step 6: Fill the Gaps

Fill in the gaps between the stones with sand, gravel, or a special paving mortar. This will help to stabilise the stones and prevent weeds from growing.

Tips for Crazy Paving

To ensure your Crazy Paving project is a success, here are a few tips to keep in mind:

Plan Ahead:

Before you start, sketch out your design or use a garden planning app to visualise your Crazy Paving. This will help you stay organised and ensure a cohesive final result.

Use a Variety of Stones:

Mixing different sizes, shapes, and colours of stones will add interest and complexity to your Crazy Paving. Don’t be afraid to get creative with your choices.

Create a Focal Point:

Consider using a larger or uniquely shaped stone as a focal point in your design. This can add a sense of purpose and direction to your pathway.

Consider Accessibility:

If you plan to use the path regularly, make sure it’s wide enough and that the stones are laid in a way that makes it easy to walk on. Avoid small gaps or uneven surfaces that could be difficult to navigate.

Maintaining Crazy Paving

While Crazy Paving does require a bit more upkeep than other paving styles, it’s not overly difficult to maintain. Here are some tips to keep your path looking its best:

Sweep Regularly:

Regularly sweeping your Crazy Paving will help prevent dirt and debris from accumulating between the stones. This will keep the path looking clean and tidy.

Weed Control:

Weeds can be a common issue with Crazy Paving due to the gaps between stones. Make sure to pull out any weeds as soon as they appear to keep your path looking pristine.

Ready to bring your Crazy Paving vision to life? At Elite Sandstone, we offer expert guidance and services to help you create the perfect outdoor space. Whether you need help with design, material selection, or installation, our team is here to assist you every step of the way. 

Contact us today to start your Crazy Paving project and make your garden a true reflection of your style. Let’s create something extraordinary together.

Frequently Asked Questions

 What is Crazy Paving, and how is it different from traditional paving?

Crazy Paving uses irregularly shaped stones, bricks, or tiles arranged in a mosaic-like pattern, creating a unique and artistic look. Unlike traditional paving, which often follows uniform lines and shapes, Crazy Paving offers a more natural, rustic, and personalised design for your garden.

Can Crazy Paving be used for driveways?

While Crazy Paving can be used for driveways, it’s better suited for areas with lighter foot traffic. The uneven surface may not be ideal for heavy vehicles, and the maintenance required for keeping it in top condition can be higher than other paving options.

 How do I maintain a Crazy Paving pathway?

Maintaining a Crazy Paving pathway involves regular sweeping to remove dirt and debris, pulling out any weeds that grow between the stones, and occasionally applying a sealant to protect the surface from the elements. Promptly repairing any loose or cracked stones is also essential for longevity.

 Is Crazy Paving safe for walking, especially in wet conditions?

Crazy Paving can be safe for walking if installed properly, with stones laid level and securely. However, care should be taken in wet conditions as the irregular surface can become slippery. It’s important to ensure proper drainage and choose non-slip materials to enhance safety.

What types of materials are best for Crazy Paving?

Popular materials for Crazy Paving include cobblestones, flagstones, bricks, and tiles. The choice depends on the desired look and the area’s use. Cobblestones and flagstones offer a more traditional, rustic appeal, while bricks and tiles can create a modern twist on this classic paving style.

Outdoor Pavers: Crafting Your Ideal Backyard Retreat

28 August 2024

Outdoor Pavers

Many Australians are dreaming of transforming their backyards into beautiful, functional havens. And guess what? Outdoor pavers are the perfect way to bring those dreams to life, offering a simple yet impactful solution to enhance any outdoor area.

Why Choose Outdoor Pavers?

Versatility in Design

One of the biggest advantages of outdoor pavers is their incredible versatility. Unlike traditional concrete slabs, pavers come in a dazzling array of colours, textures, shapes, and sizes. This variety allows you to choose a design that perfectly complements your home’s architectural style and personal taste. 

Durability to Withstand the Elements

Australia’s weather can be notoriously harsh, with scorching summers, heavy rainfall, and the occasional hailstorm. Outdoor pavers are designed to withstand these challenging conditions. Made from durable materials like concrete, stone, or clay, they are tough enough to handle the extremes of Aussie weather without cracking or fading. 

Low Maintenance for Hassle-Free Living

When it comes to outdoor spaces, nobody wants to spend their weekends scrubbing and cleaning. Outdoor pavers are a low-maintenance option that requires minimal effort to keep looking great. A quick sweep to remove debris and a hose down every so often are usually all that’s needed. 

For added protection against stains and weathering, you can apply a sealant, but even this is a simple process that doesn’t require professional help. This makes pavers an ideal choice for those who want a beautiful backyard without the upkeep.

Customizability for a Personal Touch

With outdoor pavers, you have the freedom to get creative. You’re not limited to standard shapes or colours; instead, you can mix and match to create patterns, borders, and even intricate mosaics that reflect your personality. 

The possibilities are endless, whether you want to highlight a particular area of your yard or create a seamless flow from one section to another. This level of customizability allows you to design a space that’s uniquely yours, one that fits your lifestyle and aesthetic preferences perfectly.

Choosing the Right Pavers for Your Backyard

Selecting the right pavers is crucial to achieving your desired look and functionality. Here are some key factors to consider:

Material Options

Pavers come in a variety of materials, each with its own unique set of benefits. Here’s a breakdown of the most popular options:

  • Concrete Pavers: These are the most common and budget-friendly option. They’re strong, durable, and available in a wide range of colours and styles. Concrete pavers can mimic the look of natural stone or brick at a fraction of the cost, making them a versatile choice for any project.
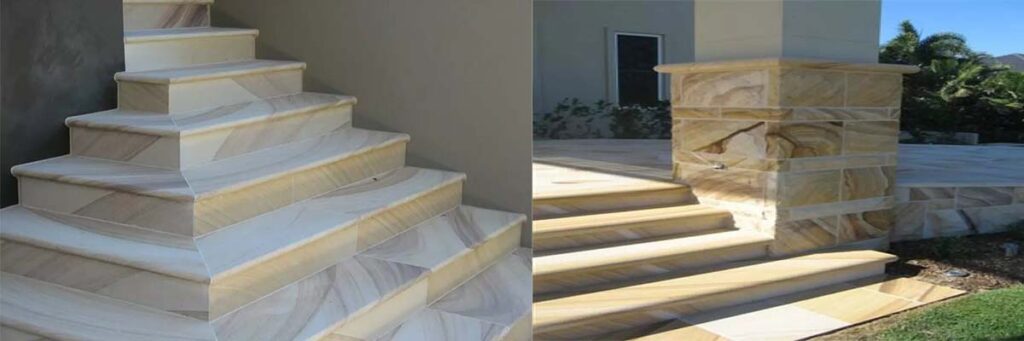
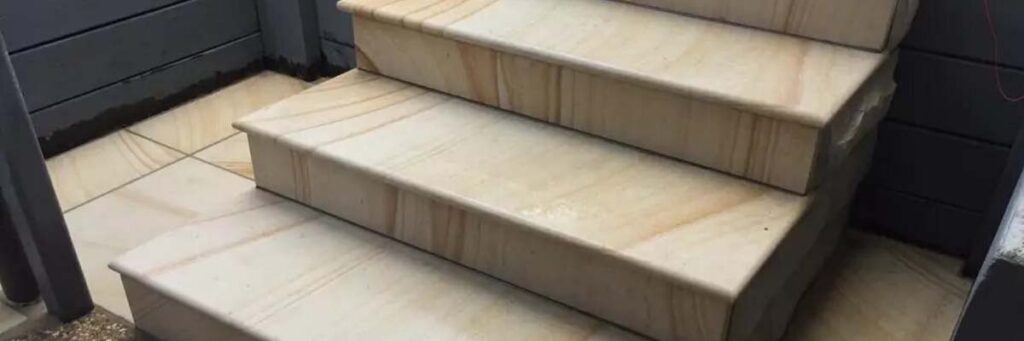
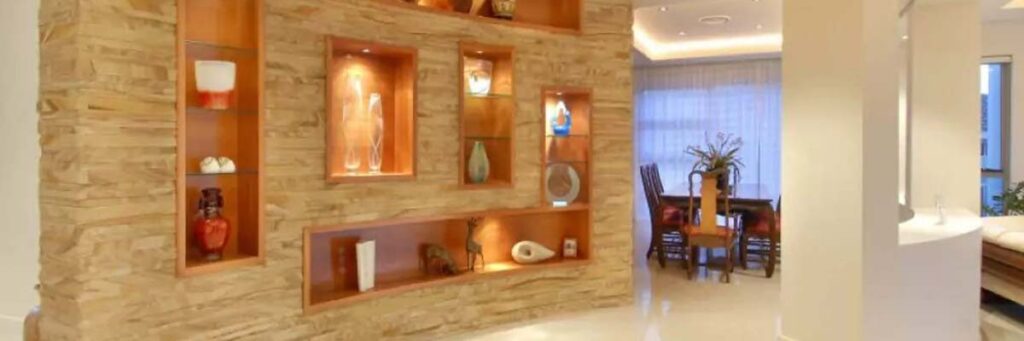
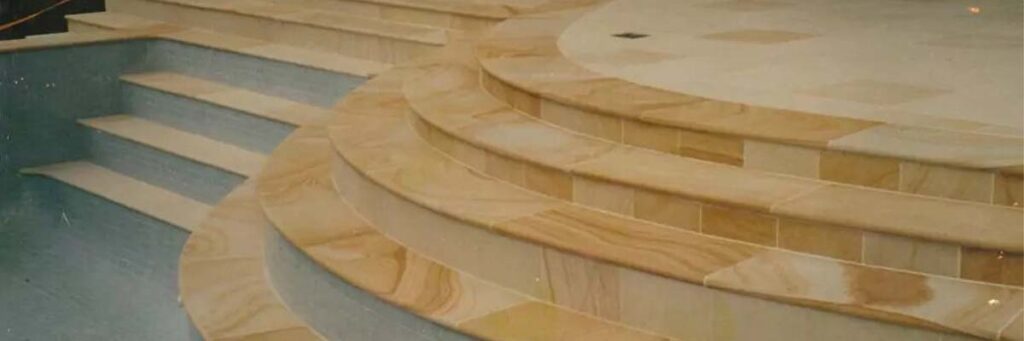
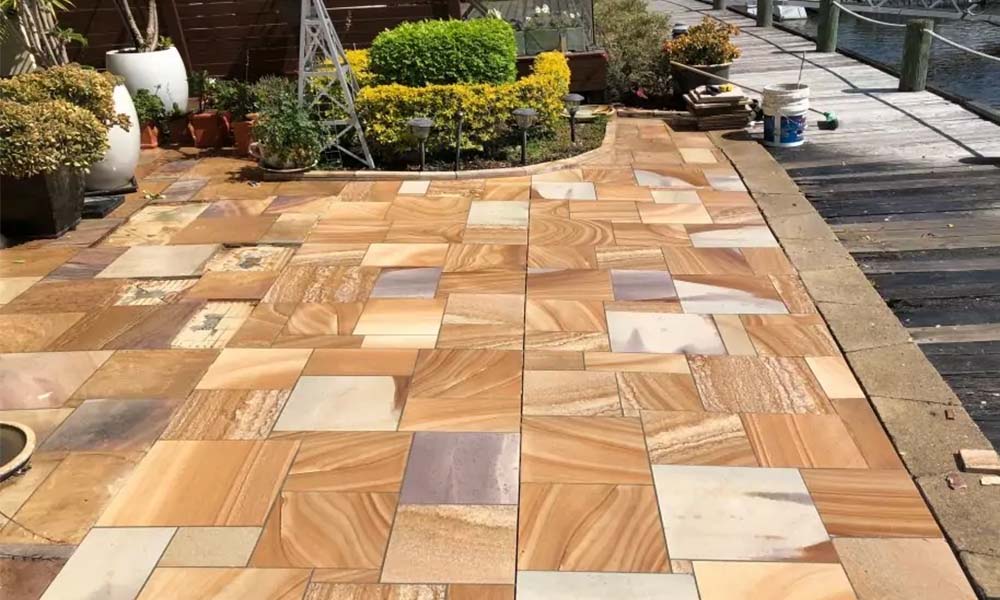
  • Natural Stone Pavers: For those looking to add a touch of elegance and luxury to their backyard, natural stone pavers are an excellent choice. Materials like sandstone, granite, and limestone offer unique textures and colours that can’t be replicated by man-made products. They’re also incredibly durable, making them ideal for high-traffic areas.
  • Clay Pavers: Made from natural clay, these pavers offer a rustic, earthy aesthetic that’s perfect for traditional or country-style homes. Clay pavers are also eco-friendly and have a timeless appeal that never goes out of style.
  • Brick Pavers: Known for their durability and classic appeal, brick pavers are a versatile option that can be used in a variety of settings. They’re available in a range of colours and sizes, allowing you to create everything from traditional walkways to modern patios.

Style and Design

The style of your pavers should complement the overall design of your home and backyard. Consider whether you prefer a modern, minimalist look with clean lines and large pavers or a more traditional design with smaller, intricately patterned pavers. 

The choice of paver style will set the tone for your entire outdoor space, so take the time to explore different options and find the one that resonates with you.

Size and Shape

The size and shape of the pavers you choose will have a significant impact on the final look of your project. For a classic, formal appearance, opt for rectangular or square pavers that can be laid in a uniform pattern. 

If you’re after a more contemporary or organic feel, consider larger, irregular-shaped pavers that can be arranged in a free-form design. Remember, larger pavers can make a small space feel bigger, while smaller pavers can add detail and interest to larger areas.

Colour and Texture

The colour and texture of your pavers should complement the existing elements in your backyard, such as your home’s exterior, landscaping, and hardscaping features. 

Darker pavers can create a striking contrast against lighter elements, while lighter pavers can help to brighten up a shaded area. Consider the climate in your region as well; darker pavers will absorb more heat, which may be uncomfortable in hot weather.

Designing Your Backyard Oasis with Outdoor Pavers

Now that you’ve chosen your pavers, it’s time to start designing your dream backyard. Here are some ideas to inspire you:

Create a Functional Patio

A paved patio is the heart of any outdoor space. It provides a solid, level surface for dining, lounging, and entertaining. When designing your patio, consider how you’ll use the space. Will it be an extension of your indoor living area, or a separate retreat? Choose pavers that complement your home’s interior design, creating a seamless transition between indoors and outdoors.

Define Pathways and Walkways

Pavers are perfect for creating pathways that lead visitors through your garden, connecting different areas like a fire pit, vegetable patch, or water feature. A well-designed pathway not only adds functionality but also enhances the overall aesthetics of your backyard. Consider using different shapes or colours to create a sense of direction and flow.

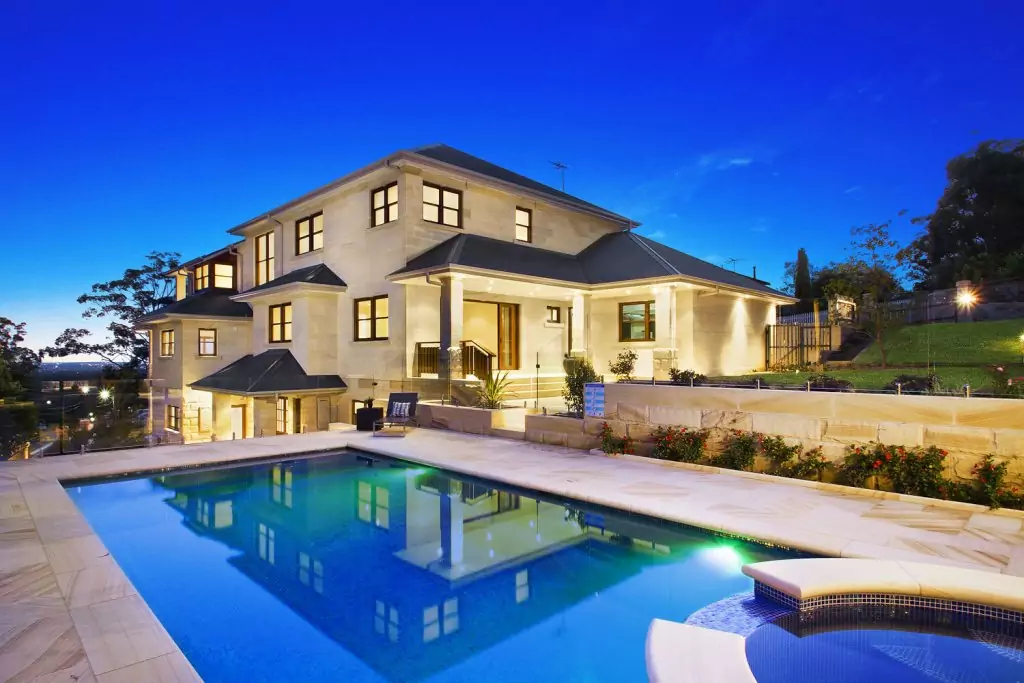
Enhance Your Pool Area

If you have a pool, surrounding it with pavers can create a safe, stylish, and comfortable lounging area. Choose non-slip pavers with a cool surface to ensure they’re safe and comfortable to walk on, even on hot summer days. You can also use pavers to create an integrated seating area or outdoor kitchen, making your pool area the ultimate entertaining space.

Maintenance Tips for Your Pavers

To keep your outdoor pavers looking their best, follow these simple maintenance tips:

  • Regular Sweeping: Keep your pavers free of leaves, dirt, and debris by sweeping regularly. This prevents organic matter from breaking down and staining the pavers.
  • Hose Down Occasionally: A gentle rinse with a hose will help to remove dirt and grime. For tougher stains, a pressure washer can be used, but be careful not to damage the surface of the pavers.
  • Seal Your Pavers: Sealing your pavers every few years can help to protect them from stains, fading, and weathering. Be sure to use a sealant that’s appropriate for the type of pavers you have.
  • Address Weeds and Moss: If weeds or moss start to grow between your pavers, remove them promptly. You can use a weed killer or a mixture of vinegar and water to prevent regrowth.

If you’re ready to start your outdoor paver project, Elite Sandstone is here to help. With our wide range of high-quality sandstone pavers and expert advice, we can guide you through every step of the process. Contact us today to get started on creating your dream backyard oasis!

Frequently Asked Questions

What types of outdoor pavers are best for a backyard?

The best outdoor pavers for a backyard include concrete, natural stone (such as sandstone or granite), clay, and brick pavers. Each type offers unique benefits in terms of durability, aesthetics, and maintenance, allowing you to choose the one that best suits your design preferences and budget.

How long do outdoor pavers last?

Outdoor pavers can last for decades with proper installation and maintenance. Natural stone pavers, like sandstone and granite, are especially durable, while concrete and brick pavers also offer long-lasting performance, making them a smart investment for your outdoor space.

Can I install outdoor pavers myself?

Yes, many homeowners opt to install outdoor pavers as a DIY project. However, proper site preparation, base laying, and levelling are crucial for a successful installation. For large or complex projects, it’s often recommended to hire a professional to ensure the best results.

Do outdoor pavers require sealing?

Sealing outdoor pavers is not always necessary but highly recommended, especially for natural stone and concrete pavers. Sealing helps protect the pavers from stains, weathering, and fading, extending their lifespan and maintaining their appearance over time.

How do I maintain my outdoor pavers?

Maintenance for outdoor pavers includes regular sweeping to remove debris, occasional hosing down to clean off dirt, and re-sealing every few years to protect against stains and weathering. Addressing any weed growth between pavers promptly will also keep your outdoor space looking pristine.

What is FAQ?

Lorem ipsum dolor sit amet, consectetur adipiscing elit, sed do eiusmod tempor incididunt ut labore et dolore magna aliqua. Ut enim ad minim veniam, quis nostrud exercitation ullamco laboris nisi ut aliquip ex ea commodo consequat.

What is FAQ?

Lorem ipsum dolor sit amet, consectetur adipiscing elit, sed do eiusmod tempor incididunt ut labore et dolore magna aliqua. Ut enim ad minim veniam, quis nostrud exercitation ullamco laboris nisi ut aliquip ex ea commodo consequat.

The Art of Ascension: Designing Outdoor and Indoor Stone Stairs

18 July 2024

Stone stairs, outdoor and indoor, can transform an ordinary space into a showcase of natural splendour, with each step telling a story etched in the very grains of the rock. They add architectural interest and a sense of permanence and grandeur to any interior design.

Stone stairs, outdoor and indoor, blend harmoniously with the landscape, inviting nature to step inside. They traverse the terrain with an air of sophistication and durability that withstands the elements, creating pathways that are as enduring as they are beautiful.

Designing with stone stairs enhances both the indoor and outdoor environment. Through thoughtful planning and creative vision, these stone structures ascend beyond mere function, sculpting a scene of elegance and refined taste for any admirer to witness.

The Foundations of Stone Staircase Design

Stepping into the world of stone stairs outdoor and indoor design, one finds a marriage of structural integrity and stunning aesthetics. The foundation of any stone staircase is critical for its longevity and visual impact. 

From the careful selection of materials to the science of their construction, these initial steps are vital to the crafting of both indoor and outdoor stairways that are not only functional but also visually captivating.

The Selection of Stone for Staircase Elegance

Choosing the right stone for your staircase is about striking a balance between its innate beauty and its appropriateness for the setting. 

Stone stairs indoors might be graced by the luxurious marbling of granite or the classic appeal of limestone, each bringing a unique texture and colour palette to the environment. A properly selected stone not only enhances the staircase’s elegance but also ensures that it’s a focal point in the home’s interior design.

Stone stairs outdoors require materials that can withstand the rigours of the elements. Slate or flagstone offers slip resistance and endurance, seamlessly integrating with the landscape while maintaining its majestic appearance for years. The right choice in stone is a long-term investment, anchoring your outdoor space with a sense of timeless beauty and resilient charm.

Structural Considerations for Stone Staircases

Beyond the visual allure, the structural considerations of stone stairs outdoors and indoors are pivotal. Each stone must be carefully measured and cut to ensure a stable and even ascent, whether for stone stairs indoor or outdoor applications. Engineers and architects work in tandem to guarantee that the load distribution of the stairway is sound, minimising wear and preventing future issues.

For stone stairs outdoor, attention must also be given to the foundation – the ground upon which the stairs will rest. It needs to be compact and level, ensuring that the stairs do not shift or settle unevenly over time. Drainage is equally important; water must be directed away from the stairs to prevent damage and erosion, ensuring that the steps remain safe and intact through all seasons.

Architectural Marvels: Indoor Stone Staircases

Start a journey of sophistication and grandeur with indoor stone staircases, the architectural heartbeats of many distinguished homes. Designing these majestic stairways requires more than mere structural considerations; it requires an eye for the interplay between form and space, creating a seamless flow within the home’s overall design narrative.

Integrating Stone Stairs in Home Interiors

Integrating stone stairs indoors can upgrade the space to new heights of elegance. Consider the harmony between the staircase and the home’s existing materials and colour schemes. The incorporation of indoor stone staircases should complement and enhance architectural features, not clash with them – this ensures a coordinated look that enriches the overall ambience. 

For a cohesive design, it’s important to consider the staircase’s balustrades and handrails, which can be fashioned from wrought iron or wood to create a beautiful contrast with the stone. Indoor stone stairs can thus become a sculptural piece, a functional work of art that stands as a testament to the craftsmanship and attention to detail involved in their creation.

Themes and Styles: Choosing the Right Stone Aesthetic

The theme and style of stone stairs indoor can significantly alter the atmosphere of a home. A grand spiral staircase with elaborate carvings might evoke a baroque or classical theme, while a simple, straight stairway of clean lines could lean towards a contemporary or minimalistic aesthetic. 

The key is to choose a stone with the right colour, pattern, and texture to complement the desired style. When selecting a theme, consider the historical context of the home and the desired ambience. 

Cool-toned marble might evoke a serene, luxurious vibe, while terracotta tones can offer warmth and a more Mediterranean feel. Deciding on the right stone aesthetic for your indoor stone staircases is as much about capturing a mood as it is about providing an essential function.

Maintenance and Care for Interior Stone Stairs

Maintaining indoor stone staircases is essential for preserving their beauty and longevity. Stone, while durable, requires proper care to combat wear and tear, mainly from foot traffic. Regular cleaning with a pH-neutral cleaner prevents the build-up of dirt and grime while sealing the stone can protect against stains and spills. 

Periodic inspections are also crucial for indoor stone staircases, as they can reveal early signs of wear or damage. Repairs should be addressed promptly to avoid the escalation of minor issues into major concerns. With proper maintenance, indoor stone staircases can continue to convey their magnificent appeal for generations.

Crafting the Pathway: Outdoor Stone Staircases

Venture outside, and you’ll find outdoor stone staircases that command the landscape. These stone stairs outdoors must harmonise with the terrain while navigating the different elevations with poise and durability. Designing these staircases requires a keen understanding of the natural environment while celebrating the rugged elegance of stone.

Harmonising Stone Stairs with the Natural Landscape

The successful integration of outdoor stone stairs with the surrounding landscape depends on a thoughtful design that respects and enhances the natural terrain. The choice of stone should blend with or complement the local flora and geological features. 

A staircase that appears to have risen organically from the earth creates a visual narrative that speaks to the artistry of landscape design.

Harmonising stone stairs outdoor with nature isn’t just about aesthetics; it’s about practicality. The stairs must be positioned and crafted to work with the existing slopes, possibly making use of the natural inclines to reduce environmental impact and ensure stability. 

A well-designed outdoor staircase should appear as a natural extension of the landscape, inviting ascent with grace and resilience.

Weatherproofing: Longevity of Outdoor Stone Stairways

Weatherproofing is critical for ensuring the longevity of outdoor stone stairways. The materials selected must endure the temperature fluctuations, precipitation, and other conditions they will face throughout the year. 

Proper installation and weatherproofing techniques can prevent common issues such as water damage, freeze-thaw cycles, and the growth of moss or algae.

Further protection may come in the form of unique treatments and sealants designed specifically for outdoor stone application. These solutions can help to repel water, resist stains, and provide a layer of UV protection, preserving the integrity and colour of the stone. 

A well-weatherproofed stone staircase remains a safe and stunning navigation feature regardless of the climate challenges.

Safety Measures for Outdoor Stone Steps

Safety is a paramount consideration in the creation of any staircase, particularly for stone stairs outdoors, where varying weather can pose hazards. 

Treads must be crafted with non-slip surfaces and should be wide enough to accommodate a secure footing. Adequate drainage design is essential to prevent pooling water or ice formation, which can lead to slippery conditions.

Incorporating handrails into outdoor stair designs not only assists with balance but also defines the boundary of the staircase for additional safety. 

The use of lighting, whether subtly integrated into the steps or as stand-alone features, enhances visibility during twilight or nighttime hours, ensuring that beauty does not compromise safety.

Elite Sandstone Stairs

At Elite Sandstone, we specialise in crafting exquisite sandstone stairs outdoor and indoor. Our range includes various styles such as curved, bush-hammered, and bullnosed stairs, tailored to enhance any landscape or interior design. 

Whether it’s a grand staircase for your garden or elegant steps for your home, our sandstone stairs blend durability with timeless beauty.

Explore our sandstone stairs collection and discover how Elite Sandstone can transform your space. 

Conclusion

In the architectural tapestry of homes and landscapes, the artful application of stone stairs outdoors and indoors provides an interlocking connection between the indoors and outdoors. These resilient and sophisticated features are testaments to beauty and practical craftsmanship. 

As we have traversed from the foundational aspects of designing stone stairs outdoors and indoors to the sustainable and innovative methods that shape them, it becomes clear that stone stairs are pivotal in elevating the aesthetics and functionality of any space. Whether they’re indoors or basking in the outdoor ambience, stone stairways encapsulate a blend of timeless charm and modern sensibility. 

With meticulous planning, creative design, and attentive maintenance, stone stairs transcend their utilitarian purpose, crafting a legacy of elegance and grandeur in architectural design.

For the finest stone stairs, outdoor and indoor, contact us today!

Frequently Asked Questions

What types of stone materials are most durable for indoor staircases?

When selecting stone materials for indoor staircases, you’ll want to opt for durable and hard-wearing options that can withstand frequent foot traffic. Granite and marble are popular choices due to their strength and long-lasting qualities. Slate is another durable stone that brings a unique texture and is slip-resistant, which is a bonus for indoor stairs. Always consider the finish of the stone as well, as polished surfaces can be slippery, whereas honed or flamed finishes offer greater traction.

Are there specific maintenance tips for keeping outdoor stone stairs in top condition?

Outdoor stone stairs require regular maintenance to keep them in top condition. First and foremost, regular sweeping is essential to remove debris that can cause scratching or staining. Periodically, you should also wash the stairs with a mild detergent and a soft brush to remove dirt build-up. It’s important to seal the stones properly with a quality sealant designed for the specific type of stone you have, as this will protect them from the elements and prevent staining. In winter, avoid using harsh chemicals for de-icing, as these can damage the stone surface over time. Instead, opt for sand or cat litter to provide traction without the corrosive effects.

Can stone stairs be customised to fit unique indoor spaces without compromising on elegance?

Absolutely, stone stairs can be customised to fit unique indoor spaces while maintaining their inherent elegance. Custom stone staircase companies specialise in tailored designs, so you can work with a designer to ensure your stairs are a perfect match for your space. From choosing the right stone materials to selecting the design details like the tread shape and balustrade style, you can fully personalise your indoor stone stairs to enhance both the functionality and the aesthetic of your unique space.

What safety considerations should I keep in mind when installing stone stairs both indoors and outdoors?

When installing stone stairs Outdoor and Indoor, safety is a paramount consideration—both indoors and outdoors. Ensure that each step has a consistent height and depth to prevent tripping. For outdoor stone stairs, select a stone with a textured finish to provide traction in wet conditions. Indoors, while polished stone may look appealing, a honed or textured finish will be safer underfoot. Additionally, installing handrails for support and illumination for visibility can greatly enhance the safety of your stone stairs. Lastly, always ensure that the installation is done by a professional to comply with building codes and regulations concerning stair safety.

Creating Timeless Paths: The Art of Sandstone Steps

18 July 2024

Sandstone steps serve as timeless pathways, offering a seamless connection between the rugged beauty of the natural environment and the structured elegance of human design.

The warm, earthy tones of sandstone blend harmoniously with the Australian outdoors, inviting homeowners and landscape aficionados to explore the possibilities of integrating these natural elements into their surroundings.

Whether ascending the gentle slopes of a garden or providing a solid footing on a steeper incline, sandstone steps in Australia are as versatile as they are striking. Embracing both the robustness required to withstand the elements and the intricate detailing demanded by discerning eyes, the creation of these steps is a testament to the craftsmanship deeply rooted in Australia’s outdoor living culture. 

Join us as we explore the artistry behind sandstone steps in Australia, an enduring tribute to the landscape, and discover how they can transform the mundane into the magnificent.

The Genesis of Sandstone Steps in Australian Landscapes

Sandstone steps in Australia are more than mere architectural features; they are a reflection of the nation’s geological wealth and historical use in design. Carving out a narrative that dates back to early settlements, sandstone steps in Australia have been a cornerstone in Australian landscapes.

Unearthing the Origins: A Historical Perspective

Australian landscapes have long been shaped by the utilitarian yet beautiful presence of sandstone steps in Australia. Originating from an era where the organic integration with the environment was paramount, these steps have witnessed the transformation of the continent’s architectural ethos. 

Early settlers recognised the robust and versatile nature of the local sandstone, initiating a practice that would withstand the test of time, both in form and function.

From Quarry to Quarter: The Journey of Sandstone

The journey of each sandstone step begins in the vast quarries of Australia, where enormous blocks of stone are carefully extracted. These raw, rugged fragments of earth are then transported to skilled artisans who sculpt them into functional works of art. 

It’s a meticulous process, ensuring that the integrity of the material is not compromised while shaping it into sandstone steps in Australia that can endure the elements and heavy foot traffic.

The Design Philosophy Behind Sandstone Steps

Behind every sandstone step lies a deep-seated design philosophy that honours Australia’s natural palette and geological splendour. 

Let’s explore the principles guiding their integration into landscapes.

Harmony with the Environment: Choosing the Right Stone

Selecting the right stone is crucial for maintaining harmony with the surrounding environment. Each piece of sandstone carries its own unique hues and patterns reminiscent of the Australian landscapes from which they emerge. 

Artisans and designers consider these characteristics, aiming for steps that complement the local flora and terrain, creating a serene journey that enhances the natural setting.

Structure Meets Spontaneity: Planning and Placement

The enchantment of sandstone steps in Australia lies in the balance between precise engineering and the organic spontaneity of nature. Designers meticulously plan out each step’s placement, ensuring they follow the terrain’s natural contours. 

The objective is to achieve a route that feels deliberate and secure while appearing as an effortless extension of the land itself.

Implementing Sandstone Steps in Modern Landscapes

Sandstone steps in Australia continue to be a desirable feature in the modern Australian landscape. They bridge the gap between ever-evolving aesthetic sensibilities and the timeless allure of nature.

Domestic Bliss: Sandstone Steps in Residential Areas

In residential areas, sandstone steps in Australia add a touch of elegance and increase the functionality of outdoor spaces. Homeowners incorporate these naturally insulating stones to create inviting access points to their abodes or garden terraces. 

They serve as an organic extension of domestic life, blurring the lines between indoor comfort and outdoor living.

Beyond Aesthetics: Ensuring Safety and Durability

The implementation of sandstone steps in Australia is not purely for visual appeal. Their construction takes into account essential safety measures and durability. 

Non-slip finishes and proper levelling are integral for preventing accidents, and their natural resistance to wear makes them a long-lasting addition to any landscape. 

This ensures that the beauty of sandstone steps in Australia is matched by their practicality and resilience.

Sandstone Steps as Art

In architecture, sandstone steps in Australia are not just functional, they are a declaration of style and a nod to Australia’s cultural landscape.

Symbolism and Functionality: Understanding the Cultural Impact

Sandstone steps in Australia hold a symbolic place in culture, blending functionality with deeper societal values. They reflect Australians’ appreciation for sturdy, enduring materials and the craftsmanship that shapes them. 

As a cultural fixture, they impose an understated yet powerful impact on the architectural language, signalling a commitment to heritage and innovation.

Innovation in Installation: Contemporary Techniques

Advancements in technology have revolutionised the way sandstone steps in Australia are installed. Precision cutting tools and innovative installation techniques allow for more complex designs and streamlined construction processes. These contemporary methods enhance both the accessibility and the allure of sandstone, making it a prominent choice in modern design projects.

Celebrating Function and Form: Sandstone Steps as Art

Ultimately, sandstone steps in Australia stand as a testament to the confluence of function and form. They encapsulate the art of marrying utility with aesthetic expression. Every step laid is a brushstroke in a larger landscape painting, celebrating the raw beauty of Australian nature through a medium that is as durable as it is captivating.

Conclusion

In the fabric of Australia’s outdoor grandeur, sandstone steps in Australia are a testament to enduring aesthetics and craftsmanship. Woven into the tapestry of Australian design, these stone features invite you to experience the seamless blend of natural splendour and human ingenuity. Offering more than just passage, they symbolise the harmony of landscape and architecture—a timeless and functional fusion.

As we embrace these enduring relics of beauty, we honour a uniquely Australian tradition and enrich our experiences with each surefooted step along the sandstone’s warm and inviting ascent. Whether integrated into a suburban garden or a grand public space, sandstone steps in Australia preserve the essence of Australia’s cultural landscape, ensuring that each journey is as memorable as it is secure.

Elite Sandstone is a premier provider of high-quality sandstone products, specialising in sandstone steps that enhance both residential and commercial landscapes. Our skilled craftsmen create bespoke sandstone steps that seamlessly integrate with the natural environment, offering durability, safety, and aesthetic appeal. Explore our extensive range of Sandstone products, designed to meet your specific needs and upgrade your outdoor spaces.

For the finest sandstone products and expert craftsmanship, Contact Us.

Frequently Asked Questions

How can I incorporate sandstone steps into my Australian garden design for a natural look?

Incorporating sandstone steps into your Australian garden for a natural look is a fantastic way to add a touch of classic outback charm. Select steps that complement the natural colour palette of your garden’s soil and stones. Arrange the steps along a meandering path to mimic the natural landscape. Use local vegetation to flank the steps, and consider planting hardy native groundcovers that can soften the edges of the steps and blend them into the surroundings. Sandstone’s natural variation in colour and texture will ensure that your garden pathway feels like an integral part of the Australian bush.

What are the best practices for maintaining sandstone steps to ensure their longevity in harsh Australian climates?

To maintain the longevity of sandstone steps in the harsh Australian climate, it’s essential to follow a few best practices. Regularly clean the steps to prevent the buildup of dirt and organic matter, which can lead to discolouration and moss growth. Sealing sandstone can protect it from moisture and reduce wear from the elements. Always replace any damaged steps promptly to prevent further deterioration. Finally, avoid using harsh chemicals or high-pressure cleaners, which can erode the sandstone surface over time.

Are sandstone steps a sustainable choice for creating pathways in Australia’s environmental conditions?

Sandstone steps are a sustainable choice for pathways in Australia’s varied environmental conditions. They are naturally durable and can withstand extreme weather, making them a long-lasting option with minimal impact on the environment. Sandstone is also locally sourced in many regions, reducing the carbon footprint associated with transportation. Furthermore, as a natural material, sandstone steps can be repurposed or recycled at the end of their lifespan, contributing to a sustainable cycle.

Can you recommend any DIY tips for installing sandstone steps in an Australian landscape setting?

For those looking to tackle a DIY project, installing sandstone steps in the Australian landscape can be rewarding. Begin by carefully planning your step layout, considering both the gradient and the stability of the pathway. Excavate the area to a suitable depth and compact a base layer of crushed rock for support. Ensure each sandstone step is level and stable before proceeding to the next, using a spirit level and sand bedding to adjust. Allow sufficient space between steps for plants if desired, and backfill gaps with soil for seamless integration into your garden.

What are some creative ways to blend sandstone staircases with native Australian plants and trees?

Blending sandstone staircases with native Australian plants and trees can create a harmonious and scenic garden escape. Use plants like Kangaroo Paw, Bottlebrush, or Banksia to provide vibrant colour and texture alongside the steps. Opt for low shrubs and grasses, such as Lomandra and Dianella, to frame the steps without obscuring them. Incorporating species like the Waratah or Grevillea can also attract native wildlife, enhancing the ecosystem around your sandstone stairs. Let climbing plants like Hardenbergia grow adjacent to the stairs, adding a lush, green backdrop and further integrating the steps with the natural vegetation.

Gentle Care for Lasting Charm: How to Clean Your Sandstone Walls

18 July 2024

Sandstone walls bring a warm, natural aesthetic to any home or garden, intertwining elegance with a rustic charm. Yet, this beautiful material requires a gentle touch and the right techniques to maintain its earthy allure without damage.

Understanding how to clean sandstone walls effectively is key to preserving their beauty for years. The process involves simple yet specific steps to prevent discolouration and erosion, often caused by harsh chemicals or abrasive cleaning methods.

In this guide, we’ll explain a reliable and easy-to-follow approach to keeping your sandstone walls in pristine condition. Grab your cleaning essentials, and let’s delve into the world of gentle care for your cherished sandstone surfaces.

Assessing Your Sandstone Walls

Before discussing the cleaning process, it’s crucial to assess the condition of your sandstone walls carefully. Identifying areas that need attention will help you clean more efficiently and avoid potential damage.

Spotting Dirt and Damage Early

Regular inspection of your sandstone walls can save you time and money in the long run. Look for any apparent dirt, stains, or biological growth, such as moss or algae, that could compromise the stone’s integrity. Spotting damage like cracks or chips early on can prevent more significant issues. Paying attention to these details during your assessment will guide your cleaning efforts and ensure a gentle yet effective approach.

In addition to visible dirt and damage, be on the lookout for subtle changes in the sandstone’s colour or texture. These can be indicators of underlying issues and should be addressed promptly. 

Early detection and maintenance can prolong the life of your sandstone walls and preserve their natural beauty. Knowing how to clean sandstone walls involves careful initial assessment and regular checks.

Different Types of Sandstone Surfaces

Not all sandstone is created equal, and recognising the variety of sandstone surfaces is a step toward better care. There are soft and porous types that absorb liquids easily, while others are harder and more resilient. 

Ensure you’re familiar with the specific kind of sandstone you’re dealing with, as this knowledge directly influences the cleaning methods and products you’ll use. Understanding how to clean sandstone walls requires knowing the finishes applied to the sandstone, such as honed, polished, or natural split, which is also essential. 

Each finish may require a slightly different cleaning approach to maintain the integrity and look of the surface. This understanding is crucial for effective maintenance and knowing how to clean sandstone walls properly.

Preparing for the Cleaning Process

Preparation is key when learning how to clean sandstone walls. Assemble all necessary cleaning materials, such as soft brushes, sponges, and mild detergents, to have them readily available. Ensure you have plenty of water, and consider laying down protective sheets to catch any runoff, especially if you’re working indoors.

Clearing the area around the sandstone walls of any furniture or decorative items will prevent accidental damage and provides you with ample room to work. Take note of any electrical fixtures or outlets and ensure they’re well-protected against water exposure before beginning your cleaning routine.

Gentle Cleaning Techniques

A mindful approach to cleaning will help preserve your sandstone walls. Gentle techniques are key to protecting the stone surface from unwanted wear or damage. Knowing how to clean sandstone walls with the right methods ensures longevity and beauty.

Dry Brushing Loose Debris

Begin the cleaning process by gently dry-brushing the sandstone to remove loose debris. Using a soft-bristled brush, sweep away dust, dirt, and any other dry particles that have settled on the surface. This step will reduce the amount of scrubbing needed later on and prevent scratching the stone’s surface with abrasive dirt during wet cleaning. Avoid using wire brushes or harsh tools that can scratch or chip the sandstone. Instead, opt for a brush that’s firm enough to dislodge debris but gentle enough to maintain the integrity of the stone. Understanding how to clean sandstone walls with dry brushing can make a significant difference in maintaining their appearance.

Using Mild Detergents and Water

Mix a solution of mild detergent and water for a gentle yet effective clean. Avoid harsh chemicals that can damage or discolour the sandstone, and opt for pH-neutral cleaners that won’t erode the stone’s natural minerals. Apply the solution using a sponge or a soft cloth, working in small sections to ensure thorough coverage without oversaturating the stone. Rinse each section with clean water after washing to remove any detergent residue. This keeps the sandstone’s appearance and texture intact while preventing any build-up of cleaning products that might attract dirt over time. Knowing how to clean sandstone walls with the right cleaning agents is essential for preserving their natural beauty.

Soft Cloth and Gentle Scrubbing

For stubborn areas, use a soft cloth paired with gentle scrubbing motions to lift dirt without damaging the stone. Stubborn dirt can be coaxed away without the need for excessive force, which could etch the sandstone’s delicate surface. Remember, patience is crucial; let the detergent work its magic before you start to scrub. 

If you encounter spots that resist initial efforts, consider using a slightly more concentrated cleaning solution, but continue to avoid acidic or abrasive cleaners. Always follow up with a thorough rinse to prevent any cleaner buildup. Mastering how to clean sandstone walls with gentle scrubbing techniques ensures they remain in excellent condition.

Specific Stain Removal

Different stains require different approaches for removal, keeping the integrity of your sandstone walls intact. Knowing how to clean sandstone walls effectively involves tailored methods for each type of stain.

Organic Stains and Biological Growth

Organic stains, often caused by leaves, bird droppings, other natural materials, and biological growth like mould and lichen, necessitate targeted tactics. 

Consider using a cleaner specifically designed for organic stain removal on stone surfaces. Apply the product as directed and allow it to penetrate the stain for optimal results. For biological growth, you may require a fungicidal solution to stop the growth at its source. 

Make sure that any product you use is safe for sandstone, and rinse thoroughly after treatment to clear away all remnants of the cleaner. Understanding how to clean sandstone walls when dealing with organic stains ensures the longevity and beauty of the stone.

Oil-Based and Inorganic Marks

Oil-based stains from grease or other substances should be cleaned carefully to avoid pushing the stain further into the porous stone. Use an appropriate degreaser and follow the manufacturer’s instructions. 

Blotting, rather than rubbing, will help lift the oil out of the stone without spreading it. Inorganic marks like paint splatters or rust may need specialised stone poultices to draw out the stain. 

These poultices often form a paste applied to the stain and left to sit until they pull the mark from the stone. Knowing how to clean sandstone walls with oil-based and inorganic stains helps maintain their pristine condition.

Dealing with Efflorescence and Mineral Deposits

Efflorescence is a white powdery residue that can form on sandstone as soluble salts come to the surface. To tackle this, gently brush away the powdery substance with a soft brush or use a designated efflorescence remover. 

Avoid washing the wall with too much water, as this can exacerbate the problem by bringing more salts to the surface. Mineral deposits, often seen as hard water stains, can typically be removed with a mild acid like vinegar diluted in water. 

However, always perform a spot test to ensure the solution does not harm the sandstone’s finish before applying it to the entire affected area. Mastering how to clean sandstone walls with efflorescence and mineral deposits ensures they remain structurally sound and visually appealing.

Regular Maintenance and Protection

A proactive maintenance plan will ensure your sandstone walls continue to exude their natural charm for years to come. Understanding how to clean sandstone walls properly is crucial for effective maintenance.

Sealants for Sandstone Preservation

Applying a sealant can protect your sandstone walls from stains and weathering. Choose a sealant appropriate for your type of sandstone and the environment it’s exposed to. Sealants can help repel water, resist stains, and reduce the amount of upkeep your walls require. 

Be sure to reapply the sealant according to the product’s guidelines to maintain effective protection. Always thoroughly clean the sandstone surface before applying sealant. This ensures that you’re not trapping dirt or moisture, which could lead to damage over time. 

Make sure the stone is completely dry before proceeding with the application. Knowing how to clean sandstone walls before sealing them is essential for the sealant’s effectiveness.

Adequate Timing for Cleaning Cycles

Timing your cleaning cycles appropriately can go a long way in maintaining the condition of your sandstone walls. It’s generally recommended to clean your sandstone surfaces at least once a year, but the exact frequency may vary depending on the location and condition of the stone. 

Observe your walls and establish a routine that works to keep them looking their best. More frequent gentle cleanings are likely preferable to less frequent, more intense cleanings. 

This ensures that dirt and stains do not have time to set in, making them easier to remove and reducing the risk of damage. Understanding how to clean sandstone walls regularly ensures their longevity and beauty.

Expert Tips for Long-Term Care

To keep your sandstone walls in the best condition possible, follow expert tips and best practices for long-term care. Avoid high-pressure washers, which can erode the stone, and instead rely on gentler methods. 

Use protective coverings or treatments on areas prone to staining, like around fireplaces or outdoor cooking areas. In the event of significant damage or stubborn stains, consider consulting a professional who specialises in stone care. They can offer tailored advice and services to ensure your sandstone remains a lasting feature of your home or garden. 

Remember, the time and effort you invest in caring for your sandstone walls are reflected in their enduring beauty and longevity. Knowing how to clean sandstone walls with expert tips can make all the difference in maintaining their appeal.

Professional Sandstone Cleaning and Sealing

Elite Sandstone offers a specialised sandstone cleaning service, ensuring your sandstone surfaces look their best. Our expert team uses advanced techniques and products to clean and seal sandstone, preserving its natural beauty and longevity. 

By removing dirt, stains, and biological growth, we restore your sandstone to its original splendour. Proper sealing protects the stone from weathering and staining, maintaining its elegance for years. 

Conclusion

Maintaining the majestic appearance of your sandstone walls doesn’t need to be an arduous task. By following the simple yet effective strategies outlined in this guide, you can ensure that these natural stone features remain a stunning asset to your property. 

Remember, the secret to successful sandstone care lies in a routine that combines assessing the stone’s condition with utilising non-abrasive tools and pH-neutral cleaning agents. Implementing a regular maintenance schedule and treating your walls with a protective sealant will also greatly contribute to their longevity. 

Embrace these practical steps to safeguard the structural integrity and aesthetic appeal of your sandstone, and watch as your walls continue to exude timeless elegance and lasting charm.

For the highest quality sandstone and expert advice on maintaining it, visit Elite Sandstone. 

Frequently Asked Questions

What is the safest method to remove grime from outdoor sandstone walls without damaging them?

To clean outdoor sandstone walls safely and effectively, it’s crucial to use gentle methods that won’t harm the stone. Start by using a garden hose to lightly wet the wall. This helps loosen up the grime. For the cleaning solution, mix mild dish soap with water in a bucket. Gently apply the soapy water to the sandstone using a soft nylon brush. Scrub in a circular motion to lift dirt without scratching the stone. Rinse thoroughly with clean water to remove any soap residue. For more significant dirt buildup, you might consider a specialised sandstone cleaner that’s pH-neutral. Knowing how to clean sandstone walls with care will preserve their beauty and integrity.

Can I use vinegar to efficiently tackle mould spots on my sandstone wall surfaces?

Vinegar, although a popular natural cleaning agent, is acidic and can potentially damage sandstone. Instead, how to clean sandstone walls that have mould spots involves using a non-acidic mould remover that’s specifically designed for use on natural stone. Make sure to follow the product’s instructions and test a small, inconspicuous area first. A soft brush can help apply the product and gently remove the mould spots without etching the sandstone. Proper knowledge of how to clean sandstone walls with the right products is essential for maintaining their condition.

What is the best type of soft brush to use when cleaning sandstone to avoid scratching the stone?

When you want to preserve the integrity of your sandstone while cleaning, opt for a natural bristle brush or a synthetic brush with soft nylon bristles. These types of brushes are gentle enough to avoid scratching the stone while effectively removing dirt and debris. Avoid wire brushes or anything with hard, stiff bristles, as they could damage the surface of the sandstone. Knowing how to clean sandstone walls with the right tools ensures their preservation.

How often should I perform maintenance cleaning on my indoor sandstone feature walls to preserve their natural beauty?

Preserving the natural beauty of your indoor sandstone feature walls requires regular maintenance. Generally, a light dusting every few weeks can prevent dust accumulation. For a more thorough clean, doing a maintenance cleaning every six to twelve months is typically sufficient, depending on the amount of traffic and exposure to dirt in the area. Always use a gentle cleaner and soft brush for the task to avoid damaging the stone’s surface. Regular maintenance and understanding how to clean sandstone walls will keep them looking their best.

Are there any eco-friendly cleaning solutions recommended for removing stubborn stains from sandstone patios?

Yes, there are eco-friendly cleaning solutions that can effectively remove stubborn stains from sandstone patios. Baking soda paste (baking soda mixed with a small amount of water) can be applied to stains and left to sit for a while before scrubbing off gently with a soft brush. This method is particularly effective for oil-based stains. For organic stains like leaves or berries, gently applying hydrogen peroxide with a soft brush can be effective. Always do a spot test and rinse thoroughly with water after treating any stains. Eco-friendly solutions are a great way to approach how to clean sandstone walls without harming the environment.

Curve Appeal: Enhancing Your Pool with Stylish Curved Coping

18 July 2024

Curved coping adds a soft, organic touch to the hard lines typically associated with pool edges, infusing a sense of style and fluidity. Whether you are contemplating a new pool project or revamping your existing one, incorporating stylish curved coping is a step toward enhancing your pool’s overall allure.

It’s all about seamlessly transitioning from your pool to your patio or deck, harmoniously blending the water’s edge with the surrounding landscape. Curved pool coping complements the curvature of freeform pools and provides an ergonomic edge for swimmers to grip and rest upon.

This guide will explore the nuances of selecting and installing curved pool coping, ensuring your swimming pool captivates the eye and invites relaxation. Embrace the curve appeal—where design meets simplicity and sophistication in your backyard retreat.

The Art of Choosing Curved Pool Coping

Choosing the perfect curved pool coping involves a marriage of form and function. You have a variety of materials at your disposal. Sandstone offers a natural look, while concrete provides versatility and strength. The key is to select a material that complements your pool and outdoor living space while ensuring longevity.

When selecting materials for curved pool coping, consider factors like heat resistance, slip resistance, and maintenance requirements. Sandstone, with its unique patterns, brings warmth to the poolside, whereas concrete can be formed and coloured to match any design. 

Always weigh the advantages and disadvantages of each material before making a decision, ensuring it aligns with your usability and aesthetic preferences.

Installation Insights for Curved Coping

The installation of curved pool coping is as critical as the material selection. A proper foundation ensures the coping sits securely and looks impeccable. Understanding the steps in preparing your pool’s edge will lead you to a flawless installation.

Preparing your pool’s edge for curved coping involves cleaning the area, ensuring a level base, and, sometimes, applying a bonding agent for better adhesion. Take your time with this stage; a stable foundation will make the installation smoother. 

When laying the coping, accuracy is paramount. Cutting and fitting the curved pieces can feel like assembling a puzzle, but with patience and precision, the result can be incredibly satisfying and attractive.

Maintenance and Longevity of Curved Coping

After investing in the perfect curved pool coping, it’s essential to keep it looking pristine. Regular cleaning and proper care are vital to maintaining the allure and prolonging the life of your pool’s crowning feature.

Routine cleaning may include sweeping away debris and occasionally washing with appropriate cleaners to prevent algae and stain buildup. Furthermore, to ensure your curved coping can withstand the test of time and elements, consider sealing the stone or concrete. 

And while durable, coping is not immune to damage; knowing when to repair or replace sections can save you from larger issues down the road.

Complementary Landscaping for Curved Coping

The journey to a harmonious and enchanting pool area extends beyond the water’s edge. Complementary landscaping plays a significant role in enhancing the sweeping lines of curved pool coping, creating a cohesive and inviting outdoor space.

Softscaping with thoughtful planting can soften the transition between the pool and your garden, while the right deck and patio design ensures a seamless flow for those enjoying the area. 

Don’t overlook lighting; strategic illumination extends poolside enjoyment into the evening and accentuates the curved contours, adding a magical touch to your backyard oasis.

Premium Sandstone Pavers and Pool Coping by Elite Sandstone

Natural stone is no longer considered more expensive than concrete and clay alternatives. Sandstone offers reliability and durability for Australia’s weather, enduring hot summers and freezing winters. 

We are the leading supplier of Australian sandstone pavers, highly suitable for swimming pools and general outdoor paving. Sandstone pavers are anti-slip and salt-tolerant, making them ideal for pools. Their natural resemblance to sand lends elegance to pool areas.

Elite Sandstone offers the finest sandstone in Australia. Beyond pools, sandstone pavers are popular for walkways, patios, and driveways due to their high performance and low maintenance. Unlike concrete and clay pavers, sandstone withstands the test of time. 

Sandstone pavers provide unique colour, texture, versatility, and durability for any creative design, adding unparalleled charm to any space, indoors or outdoors. If you seek a blend of aesthetics and affordability, sandstone pavers are an excellent choice.

For more information, visit our Sandstone Pavers Pool Coping page. 

Conclusion

In wrapping up, the elegance and practicality of curved pool coping are undeniable in any backyard sanctuary. The beautiful, flowing lines not only enhance safety and comfort around your aquatic paradise but also contribute to the lasting beauty and value of your property.

Remember, the success of your pool’s design largely hinges on careful material selection, meticulous installation, and consistent maintenance of your curved coping. 

By paying proper attention to these details and harmonising them with your landscape, your pool will embody a luxurious escape that is tailor-made for endless tranquillity and enjoyment. Embrace the curve appeal in your swimming pool project and watch as it becomes the centrepiece of a stylish, welcoming outdoor living space.

For the finest quality sandstone pavers and pool coping, explore numerous options and discover the perfect solutions for your pool. Contact Elite Sandstone for expert advice and professional service to make your poolside dreams a reality. 

Elite Sandstone offers premium materials and expert craftsmanship to ensure your pool coping is both beautiful and durable, enhancing the overall aesthetic and functionality of your swimming pool area. Trust Elite Sandstone to provide exceptional pool coping services that will transform your backyard into a stunning oasis.

Frequently Asked Questions

What are the benefits of choosing curved pool coping over straight-edge designs?

Curved pool coping not only adds an elegant and artistic touch to pool designs but also offers practical benefits. These include a more natural and flowing transition between the pool and its surroundings, creating a sleek look that can complement organic landscaping. The rounded edge of curved coping is also safer, reducing the chance of scrapes or injuries from sharp corners. Additionally, curved coping can make the pool area appear larger and more inviting, enhancing the overall aesthetic appeal of the outdoor space.

How do you install curved coping to ensure a smooth and seamless pool border?

Installing curved coping requires precise measurement and a careful approach to ensure a perfect fit. Begin by preparing a solid base, typically using a bed of mortar, to support the coping stones. Fit each piece of curved coping in place, carefully cutting the stones if necessary to maintain the curve’s smoothness and ensure a seamless fit. It’s crucial to use a level throughout the process to maintain an even surface along the pool’s edge. Once the coping is installed, fill the joints with mortar or flexible sealant to secure the coping and prevent water infiltration.

Can curved pool coping be integrated into any pool shape or design?

Yes, curved pool coping is versatile enough to be integrated into virtually any pool shape or design, be it a classic rectangular pool or a more free-form, naturalistic shape. Customisable to fit specific pool contours, curved coping can accentuate the pool’s curves and add to the design’s fluidity. With the help of professional pool designers and contractors, curved coping can be tailored to enhance the unique features of any swimming pool.

What materials are best suited for creating durable and attractive curved coping for epoll?

Materials such as natural stone, pavers, concrete, and brick are excellent choices for curved pool coping. Natural stone offers a timeless and luxurious appearance, whereas pavers and concrete provide a wide range of colour and texture options to match any pool design. Brick can add a classic, traditional look. All these materials are known for their durability and resistance to pool chemicals and weather conditions, making them ideal for withstanding the rigours of an outdoor environment.

How do you maintain and care for curved pool coping to keep it looking great year-round?

Maintaining curved pool coping involves regular cleaning, sealing, and inspection. Start by gently sweeping or hosing off debris and dirt. For more thorough cleaning, use a mild detergent and a soft-bristled brush to prevent scratching the coping surface. Sealing the coping can help protect it from stains and weather damage, and it should be done periodically as recommended by the manufacturer. Inspect the coping regularly for any signs of wear or damage, such as cracks or loose stones, and repair these promptly to maintain the integrity of the pool structure and the aesthetic appearance of the coping. Regular maintenance ensures the long-term beauty and safety of curved pool coping.

  • « Go to Previous Page
  • Page 1
  • Page 2
  • Page 3
  • Page 4
  • Page 5
  • Interim pages omitted …
  • Page 7
  • Go to Next Page »

Footer

footer-elitesandstone-logo

Visit our sandstone built display house located in Yatala between Brisbane and Gold Coast in Queensland. Our Helidon sandstone Queensland is unique to Australia and can accommodate any project requirement.

We supply sandstone garden edging, sandstone feature wall, and many more, anywhere in Australia.

Contact Elite Sandstone

Address: 11 Old Pacific Highway
Yatala, Queensland, 4207

Mobile: 0477 218 198

Opening hours

Monday – Friday: 6.30am to 3.30pm
Saturday: 8.30am to 11.00am
Otherwise by Appointment

Copyright © 2025. Elite Sandstone. All Rights Reserved.

Website Designed and Developed by Balar Media Group.